Thursday, October 29, 2009

Not up a creek yet, but I'll have a paddle when I get there!


I went to Paxton lumber with my father-in-law, Norm, last Saturday and came back with a piece of douglas fir and another of birch. Parts of both pieces have now been ripped into 3/16" strips for the laminated stems of the boat, with the softer douglas fir being used for inner stems, and the harder, more abrasion resistant birch being used for the outer stems, which will probably get a bit banged up at some point. I could have used something harder, like maple for the outer stems, but birch should work just fine and it's a little lighter, since I'm trying to keep the weight down. For a little contrast in the outer stem, I also ripped a strip of some red oak that I got off of freecycle. I'd put up a picture, but the camera's batteries are dead.

I could have used something lighter for the inner stems, like spruce or pine, to keep the weight down some, but I needed the douglas fir for the laminated paddles that I'm making. While I also want to keep the paddles light, the fir is a nice medium between a heavy and thin paddle from hardwoods and light and thick paddle from softwoods. Ideally, I'd alternate heavy and light woods, with the heavy hardwoods in the thin areas and light softwoods in the thick areas of the paddle. But, I had some maple on hand from the same freecycle donor as the oak that I wanted to use (I also got a bunch of studs and 1 x 12's from them). Since maple has a high ratio of expansion, I needed something that more closely matched it than the lower ratios of the lighter softwoods. Plus, since this is my first paddle, it will be sturdier with the medium density fir. The wide grain of the fir makes a nice constrast with the lighter grain of the maple, don't you think?

My original plan was cut out all the wood to make two paddles, but it didn't quite work out that way. The blade of my table saw kept going off course so that I couldn't get a straight cut. Since the maple was 3/4" thick and I needed two lengths as close to 3/8" thick as I could get them for the paddle laminations, I ended ruining one of the two pieces of maple that I had. I managed to salvage the other piece, but the paddle will now be about 1/4" less wide than the pattern called for and on the thin side.

My table saw is a genuine antique Craftsman, probably older than my dad, and possibly as old as my grandfather. (yeah, I got it off of freecycle, too; I love that site! :-) It has a 1/2" shaft, and all my saw blades have 5/8" augers. The guy who gave me the saw had included a bushing to adapt the blades to the shaft. My theory is that when the blade heated up and expanded, the bushing, which is only 1/16" thick, slid off to the side of the blade and into the hollow in the washers. This allowed the blade drop and wiggle all over the place. I got a couple more bushings today, put them on in addition to the other bushing, and it now cuts like a dream! It might also help that I used a newer blade instead of the ones the guy included with the saw that looked like they might be just as old.

So, now that the saw is working well, I hauled it out into the driveway to rip the strips for the stems. It was frigid work, considering that the temperature dropped and we got about 12" of snow dumped on us this week, but I needed to get the inner stem thickness figured out before I could cut the forms for the stem. And the driveway had been shoveled by the HOA, so at least I had room for it! If I can get a few more pieces cut out for projects like the seats and thwart, then I can at least have them ready to work on inside when the weather turns nasty again in the future.

Thursday, October 22, 2009

Forms are marked out

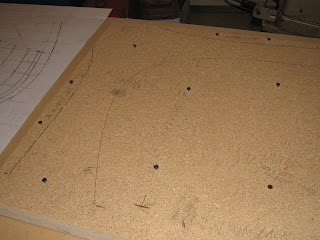
This week I've been working on transferring the lines from the plans to plywood for the forms. This will be covered in more depth later, but the forms are patterns that are placed about every foot on the strong back. The cedar strips are laid over these to create the shape of the canoe. The shape of the forms is taken from the lines of the plans. It's possible to buy pre-printed plans for canoes and boats, but one of the reason's that I chose to build the "Bob's Special" is because the lines were available for free from the book "Canoecraft" by Ted Moore, which I checked out from the library. The book didn't contain actual plans or lines at all, but a table of numbers called "offsets". These allow you to graph out points along the lines, which you then connect using a batten, a flexible strip of wood in a process called "lofting". To keep the batten from moving while you play connect-the-dots, nails are driven through the points graphed out, the batten is placed against them on the poster-board, which is tacked to some plywood, and then more nails are driven against the other side of the batten to hold it in place. Since the canoe is symmetrical side-to-side, only one side is drawn to save time and resources.

This process is called "lofting" because it was originally done in lofts over the floor of the buildings where construction was taking place in the boat-yards and boat-sheds.

The process of transferring lines to plywood to mark out the forms is very similar to lofting the lines. The poster-board with the lofted lines is tacked down to the plywood with the baseline of the plan and the bottom of the plywood aligned and the centerline of the plan matched to a line drawn perpendicular to the bottom of the plywood. The batten is secured to the plan and plywood with nails driven on either side of it and the line is drawn along the side of the batten, as in the lofting process. The difference here is that two layers of carbon paper are lain down between the plans and the plywood, so that the line is transferred to both the plywood and the backside of the plans. Then the plan is flipped over, aligned with the center and baselines, and the batten secured along the newly transferred mirror image line with carbon paper between the plan and the plywood to trace this line for the the other side of the form.

Once the lines are transferred to the plywood, another sheet of plywood is clamped underneath with their baselines aligned, pilot holes are drilled, and the two are screwed together. This will allow two copies of the form to be cut out at the same time. Because this canoe is symmetrical fore and aft, two copies are needed of all of the forms except for the center one. This saves time marking a second form, and will later aid in making sure that the two sides are symmetrical.

Wednesday, October 14, 2009

Strong-back is finished!


All right, the second step in the actual construction of the boat is done. The first step was lofting the plans from the offsets, but since I did that before I started the blog, I'll cover it later.

The strong-back is basically the platform on which the boat is built. It's a long, flat, sturdy beam of wood. Mine is made from two sheets of 3/4" particle board and is 16 feet long by 1 foot wide and is 24" off the ground. I could have made it taller, but with the canoe being about 24" off the top of the strong-back, I figured that would be plenty tall for me (at only 5' 7" on a good day) to be able to look down on the top of it and still have some leverage for sanding, etc. It's sturdy enough for me to get up on it and walk up and down it a couple of times and heavy enough that I was able to stand on almost the very end without budging it.

I wasn't paying attention to the doofus at Lowe's who cut the particle board for me. I had asked for six equal 8" strips from the 4' x 8' sheet, so he should have set the fence for the saw at 7 7/8" to keep them all equal. Instead, he set it at 8", leaving me with one strip that was only about 7" wide. Because I forgot to use the narrower strip in a certain part of the strong-back, I had to go back and buy a third sheet of particle board. It wasn't all bad though, because I was able to use part of the extra sheet to build the top for a work-bench, which I've been needing.

The white strip down the center is spray-paint. I tied a piece of string to screws in either end of the strong-back and spray-painted over it to leave a blank center line. This makes a straighter line than using a yardstick over and over and is more reliable than a chalk-line, which can actually bow out up to an inch when you snap it.

Bob's Special

The canoe I've chosen to build is the "Bob's Special", as designed by Ted Moore and Steve Killing of Bear Mountain Boats.

It's based on an older boat built by the Chestnut Canoe Company that was designed as a light, small load carrying boat for active outdoorsmen. From the description on the website, I gather that the original boat was also built using an older version of cedar strip building, from a time before the use of epoxy and fiberglass. This would have used a series of ribs to hold the strips in place and relied on a tight fit and the swelling of the strips from the water to make the boat waterproof.

I chose this canoe for the following reasons:
  • The offsets to draw out the plans were available for free from the book "Canoecraft" by Ted Moore, which I got from the library. (I wouldn't mind having even a used copy of this book if anyone's looking for Christmas ideas :-)
  • Being symmetrical fore and aft, the canoe can be paddled in reverse by a solo paddler sitting on the bow seat without changing it's paddling characteristics. This will also allow me to add a sailing rig at a later date to turn the canoe into a proa, a sailing outrigger canoe that has to be symmetrical fore and aft to make it work properly.
  • The "Bob's Special" is fairly wide across the beam for a performance canoe. This makes it fairly stable and less tippy (important for getting Sarah to get in it with me) and gives it the ability to carry a pretty good load (important for camping trips).
  • Despite the fact that the the beam is fairly wide, most of this width is above the waterline, leaving the canoe a bit narrow at the water. This means that when the canoe has light load, it can be fairly fast and easy to paddle, but it still has a reserve of stability from the width when the canoe is heeled, or tipped over on it's side. As the load increases, the canoe sinks further into the water and this width creates a reserve buoancy, allowing the canoe to carry more, like say, for a long camping trip :-)
  • This canoe has a moderate rocker, or curvature from front to back. The more rocker or curvature a canoe or boat has, the easier it is to turn, but the harder it is to track, or keep going in a straight line. This is important to me because the water around here is mostly flat lakes, which calls for good tracking, to go in a straight line instead of roaming all over the place, wasting energy. But, I still want it to be able to turn well in case I take on a flat water river, like those in Missouri that I learned on.
  • The plans that Bear Mountain Boats sells for this canoe include an option to stretch it, making it a bit longer and increasing it's load carrying capacity (a longer boat can displace more water, increasing the buoyant forces on it) and it's speed (a longer boat has a longer bow wave, increasing it's top speed before the resistance of the water it has to displace to move forward overcomes the force the boat is able to create to overcome it). Because it has been stretched before with success, I have no qualms about stretching the boat for my own purposes.

The impetus for my current project...

I say this is my current project, rather than my first, because I've already done a few things on the Capri 14 that my friend Rosy gave me a year ago. However, this is definitely my first boat building project!

Sailing and boating have been dreams of mine for as long as I can remember. There is an aura of adventure and freedom that follows from embarking on the open water in a sailing vessel. With the wind driving you as a wealth of free energy that power cruisers can't even dream of, an easily driven hull that could be human powered in the necessary circumstances, and an absence of roads to hinder and restrict your heading, the world lies bare before you, waiting to be explored! Even if it's on the much smaller scale of the local Lake McIntosh :-)

My current project is a cedar strip canoe. This means that it will be made out of long, thin strips of cedar, which will be sandwiched between two layers of fiberglass and epoxy resin. The cedar strips will be lain out over forms, glued together, and then covered in fiberglass and epoxy. There are other, simpler ways to build boats, but strip-building lends itself very well to the long, flowing curves of a canoe, as well as making for a very light, very beautiful final product.

I had considered other methods and other boats, but most of these called for the use of marine quality plywood, which would be difficult to find and procure here in the Denver area; especially in the small quantities that I would be using for my first boat. Cedar is much more readily available in this area.

Among the boats that I had considered building before is the D4 dinghy, designed by Jacques Mertens, and almost identical to the one shown here. This is a small dinghy about 8 feet long and 4 feet wide that can be sailed or rowed. The plans are available for free download from the internet and it is a well known and popular boat in the amateur boatbuilding community. My thought was that I could build this boat relatively quickly, easily, and cheaply. While building this small boat, I would gain some valuable experience and could have some fun with it while working on a slightly larger dream boat. In addition, a small dinghy like this would come in very useful if I am to have small sailing yacht someday. :-)

The main thing I wanted from my first boat would be something that could be carried on top of the car and launched in local lakes relatively easily by myself, since I'm reluctant to put a hitch on the Altima and us it to launch a boat from a trailer. I also wanted a boat that would get Sarah excited about joining me on the water. My first boat would also have to be fairly straight forward to build and relatively inexpensive. I wanted my first boat to be an investment in my future boats, both in experience, building up my collection of tools, and return on capital should I one day decide to sell it to finance something larger.

Based on those considerations, I decided against building the D4 dinghy. It would require a small quantity of marine quality plywood, which as I stated above is a difficulty. As a sailing boat, it really would only accommodate one person, so having Sarah join me for that wasn't likely. My past boating experience, other than in the Capri 14, has been in paddling canoes and kayaks, so I see rowing as more of a utilitarian exercise than a pleasurable one. Also, in this area, there just isn't much of a resale market for dinghies that I am aware of. So I reconsidered what I would build and decided on a canoe.

My decision to build a cedar strip canoe was based on the following:
  • I have experience with paddling various types of canoes on the Ozark National Scenic River-ways with Discovery Ministries in Missouri and love the feel of the paddle and the maneuverability, versatility, load carrying capacity, and gracefulness of these craft.
  • Sarah has experience canoeing, also, and seemed more excited about a canoe than a dinghy.
  • I'm fairly familiar with the strip-building technique from my time in Chicago when I extensively researched and considered building a cedar strip sea kayak at that time. I decide on a canoe, rather than a kayak, for this project because canoes are simpler to build without the decks, Sarah could join me in it, I prefer the sitting up position of the canoe, and the canoe lends itself to recreational sailing better than a kayak, where sailing is more of a utilitarian exercise.
  • Strip-built craft generally have a higher resale value and return on investment than one would expect out of a plywood, plank sided dinghy. They can be built very lightly and still be very durable, and do it with an elegant beauty.
  • Being longer and narrower, a canoe can make for a faster, more thrilling experience when modified for sailing than a short, squat dinghy.
  • My friend Jud, from Camp Como often takes a fall canoe trip to the Boundary Waters Canoe Area Wilderness, and I have dreamed about going with him on one of these trips. The experience would be incredibly heightened by doing it in a boat that I have built myself.
And so it was with the previous considerations that I embarked the project that is rapidly filling my garage at present...

First Post

At the request of family, I've been asked to post my boat building progress on the web, so that they may follow along in the adventure. To that end, I've created this blog and will post periodic updates on my boat building, as well as the occasional musing or dream for future boats and links to websites that further explain my raucous ramblings.

Please, feel free to utilize the comments section to post any questions that come up while reading about my boat building adventure!